Beginner's Guide
Welcome, Exile! As you prepare to survive in the Eastern Marches, we have a few tips to get you started.
New Character Set up
There are many options for personalizing your Exile. From skin color to tattoos, the appearance of your Exile is up to you. To name or modify the appearance of your Exile at any time, click on your avatar image in the top left corner.

Then click the "Avatar Icon" from the menu on the left hand side.

From this menu, you will be able to name your Exile, and customize it. Don't forget to tap "Apply" when you have finished!
Game Settings and Options
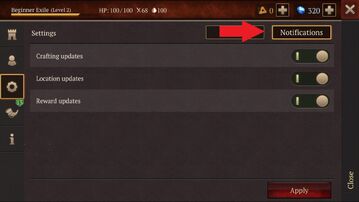
You can customize your game from the game's "Options" menu. After clicking your Avatar image, select the gear as indicated below. You can chose the language your game displays in, music and sounds, blood, as well as the level of graphics. IMPORTANT: Be sure to bind your account to either Facebook or Google Play by making sure one of the two boxes at the bottom of the screen are connected as shown below.

Selecting the Notifications button in the top right corner will allow you to select which notifications you wish to receive from the game.

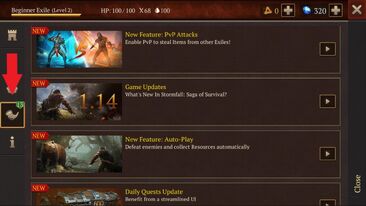
Announcements
You can read all about the latest updates, new content, bug fixes and in game events in the announcement tab.

Information
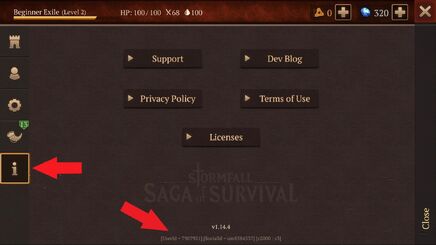
The Information Screen can be found when you select the "i" icon. In this screen you will find links to contact Support, information on Plarium's Privacy Policy and the Terms of Use as well as licensing and a link to the Official Saga of Survival Facebook page under Dev Blog. IMPORTANT: At the bottom of this screen you will find your Player ID Number and your UM Number. These numbers identify you as a player and will be required when contacting Support. We advise you take note of these numbers and keep them in a safe place.

HP, Hunger, Thirst, and Curse
HP or Hit Points, is your health. Health decreases when your Exile is hungry, thirsty, or taking damage while fighting monsters. Consuming healing items or food will increase your HP. Some examples of these would be the healer's satchel, bandages, blessed water, cheese and roasted meat.


Hunger is indicated by the "fork and knife" icon. Your hunger decreases as you harvest resources. You can increase your hunger by eating foods such as berries, cheese, roasted meat, and hearty soup.


Thirst is indicated by the "drop" icon. Thirst decreases as you fight monsters. To increase your thirst, drink water, berry tea, mead, or other items as indicated in the game.


Curse is indicated by the "eye" icon and the purple number next to it. The higher the curse, the easier it is for enemies to sense you from further away. Curse makes it harder to sneak attack. Your curse can reach as high as 200. At 50, you can't sneak attack. At 100, you will pull or attract half of the zone. At 200, you will pull or attract all enemies in the zone. Drinking a potion or eating food that reduces curse can help keep this number low.
Level


Avatar showing level
Your level is indicated by a number next to your avatar's image. You gain levels by earning experience points. Experience points are earned by harvesting resources, crafting items, building and improving your shelter, defeating monsters, and upgrading crafting stations.
Elite Pass, Divine Pass, and Free Premium
There are two passes available for purchase. The Elite Pass and the Divine Pass.
The Elite Pass will boost your Exile's parameters with:
- +50% XP Boost
- +25% Repair Efficiency
- +50% Ranking Points
- +50% Quest Points
- +25% Detectability Reduction
- +25 Hunger Reduction
- +25% Thirst Reduction
- +25% HP Restoration Boost
The Divine Pass boosts your Exile with the 8 bonuses listed above and includes the ability to claim Smuggler Rewards without watching ads.
The Free Premium program allows players who do not purchase the Elite or Divine Pass to activate the Premium program for 1 hour by watching an ad. The Free Premium program is available every four hours, after it's been activated.
Gems, Vault, Tokens

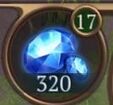
Gem & Vault Icon
Gems are earned by completing daily tasks and completing faction feats. Gems are used to revive if you should die, to repair armor and weapons, speed up production, start a clan and purchase certain items from the store.
The smaller number above the gems is the number of items in your Vault. The Vault is where items purchased from the store are deposited as well as items earned by completing the daily quests and Faction feats.
Daily Tasks

Daily Task Scroll
Each day at 00:00 UTC, every exile will be given a set of tasks to accomplish. Upon finishing the task, you are awarded Quest Points toward earning a reward chest. Reward chests can contain various resources, armor or weapons. Access the daily tasks by tapping the daily task scroll in the upper right hand corner of your screen.

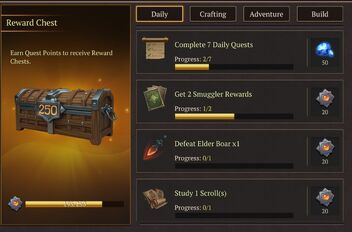
There are four categories of tasks; Daily, Crafting, Adventure and Build. Quest Points awarded will vary according to difficultly level. Reward chests are earned at various point levels, 200, 300, 400 and 500.
Crafting Menu
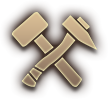
Crafting Icon
The crafting menu is located on the right side of your screen. As you level up your exile you will be rewarded with the ability to craft items and workstations with resources harvested or looted.
To craft an item you must have the ingredients necessary in your bag inventory. Then simply tap on the icon located on the right side of your screen and scroll down to the desired item.

HINT: At level 4, you will be able to craft and upgrade the Signal Fire. Craft this to access the World Map, participate in chat rooms and access new locations in the world map.
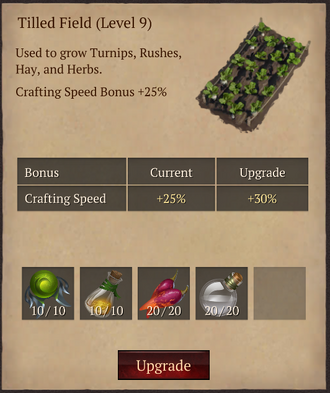
Upgrading Crafting Workstations
After building a crafting workstation from the crafting menu and placing it in your shelter, you can upgrade the workstation to be able to craft additional items. To upgrade your workstation, open the workstation and in the top left corner, above the anvil, is an arrow. Click the arrow and fill in the slots. Once items are filled in, they cannot be removed so choose carefully.

Back to Main Page.